Wednesday, February 23, 2011

February - Flag Book

As my January books were all very conservative and traditional, I decided to go for color in February and chose a flag book. Flag books use an accordion binding with rows of pages (the flags) glued to both sides of the folded spine.  When you open it as you would a regular book, with the pleats still fairly close together, the pages - or should I say rows of pages - turn as you would expect.  As the pleats are pulled open some of the flags face the cover and some the back, depending on which side of the folds they were attached to.  Then when you pull the book out flat you see only one side of each flag.

If this all sounds confusing, try putting one of these together.  It is one of those things that sound simple, and in fact is simple, but when you are doing it there is a contant state of panic that you have glued something to the wrong side of something...and I only did that once. 

I had some wonderfully colorful paper and rather thought I would start on the book without knowing for sure what would go in it.  It doesn't make much sense to make one of these blank and I soon saw that the art or attachments really needed to be put on the flags before they were assembled.  So, I fell back on my tried and true postage stamps.  I pulled the page that had all the canceled stamps to match my colors - yes, I sort my stamps by color, doesn't everyone?

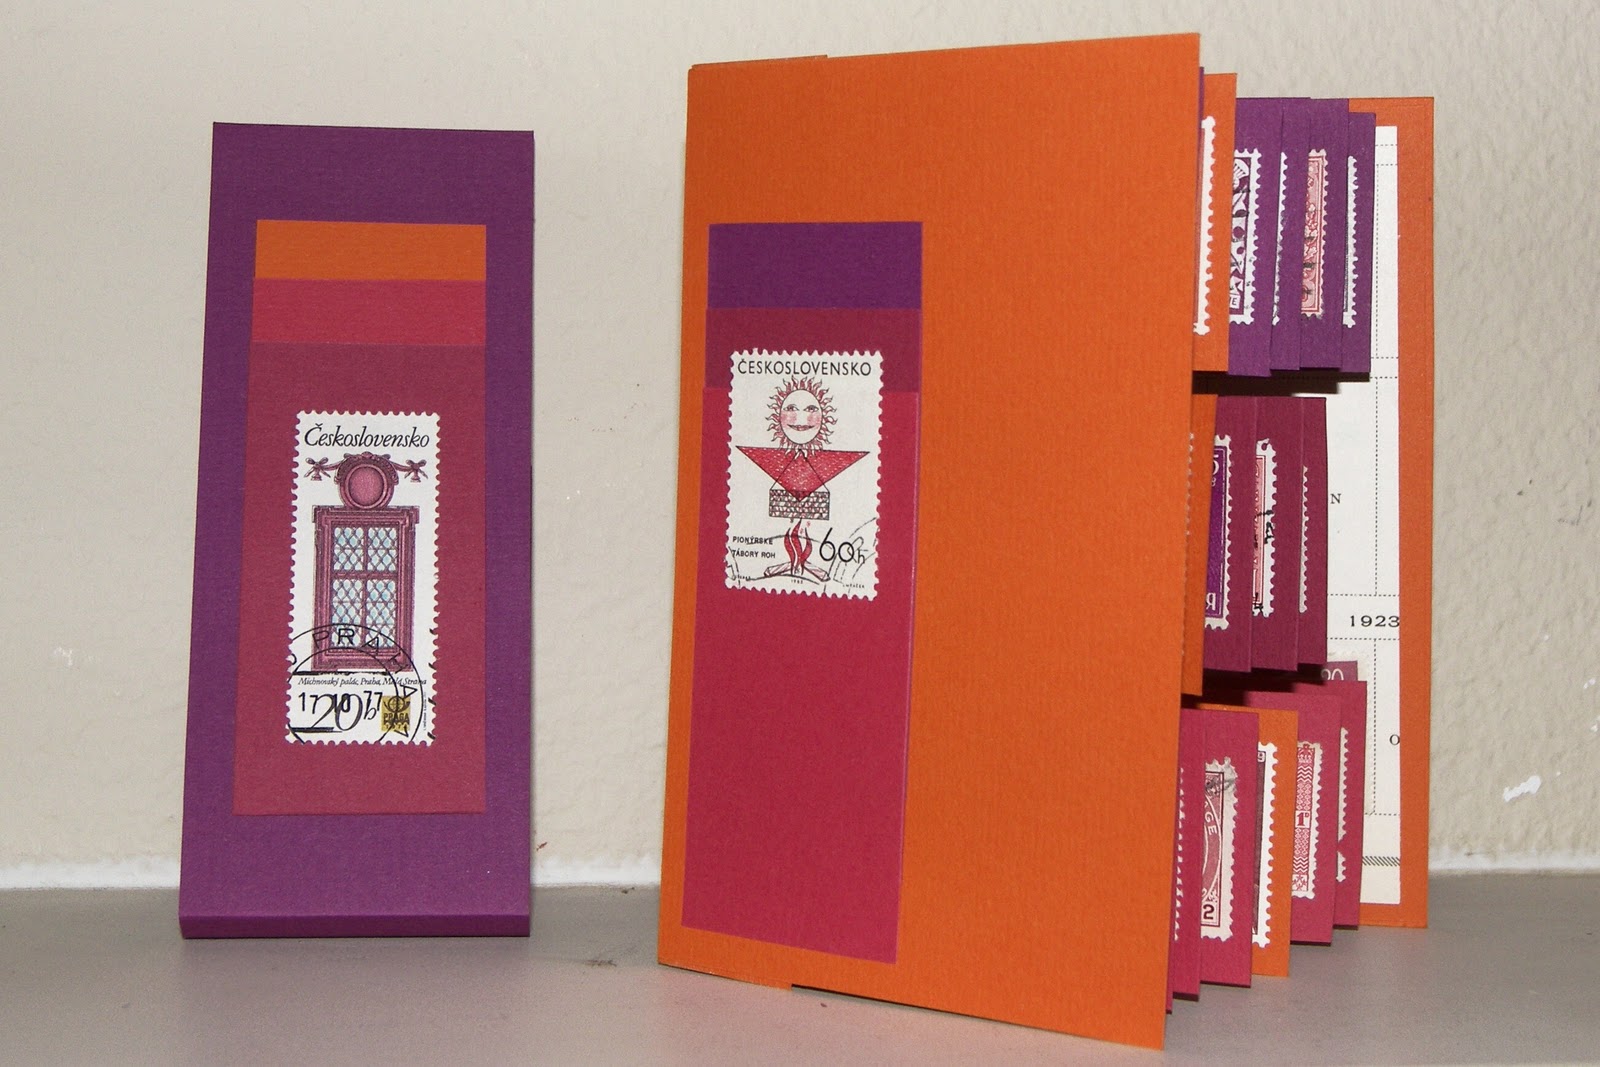
When barely opened, you can see it looks quite normal. I made a paper band to keep the book closed which simply slides off and on and covers the decoration on the front cover.

Partially opened you can see both sides of the flags.  I used more of the paper from my old stampcollecting book for the endpapers - ones with matching colors of course.

And here we are fully opened, with flags going in opposite directions.  I used only stamps with faces on the sides which would show when opened.  The other side of each flag had a stamp with a heraldic device of some sort, mostly lions.
I would like to do another flag book, but I am waiting for inspiration to strike.  As I worked on the book I realized it was the sort of book that is absolutely perfect for a few applications, but not really appropriate for most.  One of the best things about it is that is was finished on the 17th of February, so my goal of making a new book every month is so far intact.

Friday, February 11, 2011

Leaves Book: Part Two

I have to laugh at the amount of leaves I pressed that year.  It was lovely to have so many to choose from when I made this book, and I did use some in ATC's, but I must have pressed hundreds - really, several hundred - and I couldn't possibly have used more than fifty altogether at the time.  I still have a drawer full of them, sadly fading, and probably destined to fade away to brittle bits.  When that happens, I'll just go out collecting and press a couple hundred more.

Gold envelope for rubber stamped tag, maple leaves.

Pocket for tag, postage stamp, tassel, rubber stamps.
This page was another clear envelope with additional transparent pocket and vintage photo.
Handmade paper with leaves embedded. Blackberry on the left.

Postage stamp, and the same leaves as in the envelope.

I edged this page and the next with latin names of my favorite trees.
Postage stamp, rubber stamps, small envelope
It was surprising how some of the prettiest leaves when pressed were quite unimpressive.  The biggest surprise was how blackberry leaves kept a dainty red border.  I found a laceleaf maple in glorious red and orange outside a Starbucks with very tiny leaves and I think I used every one of them in one project or another.

When I conceived this book, I went through all my materials and scraps to pull everything leaf-related.  The process itself was great fun, but more importantly it reminded me what else I had waiting tucked away for other projects.  It is often a joke among my friends how I continuously organize, sort, and arrange all my materials, but just going through them is an enormous inspiration - every bit as much as books and magazines.

Tuesday, February 8, 2011

Leaves Book: Part One


 About the same time I made the Copper Book for my daughter, I made a Leaves Book for myself.  Having spent the fall pressing leaves I was well supplied.  The book was made the same way as the Copper Book: hard covers with accordion spine and individual pages glued in.

The tassel made from yarn, threads, beads, and a copper tag. 
The covers were made with a handmade paper with natural bits in it and the back stamped with gingko rubber stamps.  The pressed gingko leaf has lost its stem I am afraid. 
Postage stamps and maple leaves.
A piece of handmade paper with a leaf embedded and two skeleton leaves.
This page was a clear envelope with the largest leaf inside the envelope.  I used clear embossing powder on the leaf and it has cracked a bit with use.
This leaf was embossed with a very granular rusty powder.

The other two Canadian postage stamps, joss paper, plastic leaves and rubber stamped leaves.

There are so many lovely quotations about leaves I was hard put to choose.

Monday, February 7, 2011

One More for January


My January book project has bled over into February a bit, but I feel that I have a handle on the stab binding technique even though I didn’t try any of the fancier binding stitches.  I am sure I will be making more books with this technique as I have a lot of papers that suit the Japanese style binding.

There are several errors on this book, which I could just conveniently forget to mention, but I think I remember saying something about confessing my mistakes honestly.  When I glued the paper onto the board pieces (I used mat board) I didn’t use quite enough glue and there are a few spots with slight bubbles.  Since this was the first time I made covers using two pieces on each side to form a hinge, I was quite nervous about getting both pieces placed correctly and while fussing about that I used the white side of the mat boards on one cover and the tan sides on the other.  Now you can’t see both sides at the same time, so no one is likely to notice it, but I know.

One small thing I learned, since I used my Dremel tool to drill the holes, the hole where the drill bit comes out is cleaner than where it goes in so I will drill from the back in the future.

I sewed the binding so that the tie would be on the front and used some beads to decorate the thread ends.  The insides of the covers are of solid purple card stock and the text block is a textured cream paper.  The Japanese script decorating the front is from one of my ‘collage source’ books and I have absolutely no idea what it means…or even if it is right side up

Since this is real book, I will sign it, something I forget to do too often.

Thursday, February 3, 2011

A Few More

Part of this year long project was to use up some of the papers and materials I've squirreled away for the last thirty-plus years.  The good news is that I already have used some, the bad news is that it's just a drop in the bucket.

Years ago I worked for a company that made diplomas, and at one point I was in purchasing.  As a result, I brought home several 'books' of paper samples - colors and textures that made my mouth water.  What is it about paper and yarn that does that to me...subject for another post I suspect.  At any rate, I cut down some of these samples, sorted them in color families, and made a few more small stab books.  I pulled the cover papers from my paper scrap bin.  No amount of books or projects will ever make a dent in that bin, papers breed like rabbits.

Tuesday, February 1, 2011

January - Japanese Stab Book

For my January Book Project I decided to make a Stab Book – other names I found are Pillow Book, Japanese Stab Book, and Side Binding Book.  I have a couple of vintage stab books as well as a book whose cover is printed to look like a stab book. 

If you look closely you can see the staples showing through in the fake stab book on top.
Traditionally they use a soft paper and each page is folded with the fold edge out.  I chose to use pages from an old postage stamp album thinking they would allow for brief notes – something you could carry in your purse. In addition to the stamp graphics ( I chose pages with a minimum of stamp illustrations) I loved the printed color names.  The text block is bound with linen thread in addition to the cover binding for additional strength.
I bound it with washi paper, which is quite strong, using the linen thread again. There is
a very good 2-part video on youtube demonstrating the stitching: http://www.youtube.com/watch?v=mUD0iKBkCVo  To match the pages I decorated the front simply with stamps.

All things considered, I am quite pleased with this first monthly project and since it comes together pretty quickly, I should make a few more before I start my February book.