Saturday, June 21, 2014

Envelope Book

At the rate I'm going it will take me at least ten years to finally make all the book types on my list. This was one of the easier styles to actually produce, but a bit difficult to decorate. It was a matter of determining what was up and what was down - I didn't always figure it out as you may notice.

I made five of these, to commemorate a wonderful weekend with some dear friends where we talked about family and England, ate great food, and celebrated our love for Cornish Kitchenware. I had photos from the weekend and a Pinterest board of Cornishware to work with. Inspired by the blue sea & sky of Cornwall, which is dotted with the sparkling white cob cottages, it's a color scheme that cries out for accents of yellow and red.

Our Breakfast Table
As you can see, I take Cornishware very seriously

The book itself is a simple matter of gluing the flap of one envelope to the back of another, continue on in this manner until you are done and then fold accordion fashion. I used five envelopes, which given the amount of stuff I put in each envelope was about as many as would have worked. Matching the stripes meant I had to use an envelope with a deep triangular flap. If I were to make another in this style I would want to use a blunt flap envelope - much easier to decorate.

I considered punching and reinforcing the top flap so the book could be hung, but eventually decided against it and chose to close it with a simple tie of yellow and white string. Red was used as the accent on one side and yellow on the other using art and geometric punches. After that it was a simple matter of filling the envelopes with photos and the remaining art.


I will almost certainly make another envelope book at some point, perfect for a trip journal where you want to save bits and pieces of paper souvenirs (you have no idea how many foreign receipts I have stashed away), or any book with a lot of photos.

Tuesday, January 3, 2012

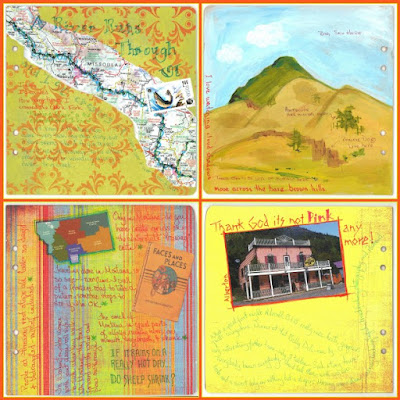
Still at it....The Montana Book

I haven't given up! In fact, I have rolled over all my 2011 Year of the Book resolutions to 2012. I think I'm allowed to do that...by my rules at least. I have been working on pamphlet sets all along and will be posting some of them on Etsy as soon as I get a shop set up. I took the month of November off from blogging to do NaNoWriMo, which is, in short, writing a 50,000 word novel in the month of November. This was my first try and I am proud to say I completed at 51,022 words - all I have to do now is edit, no small job I assure you. Catching up begins with completion of one of my nearly finished books. As is almost always the case, I wasn't nearly as 'nearly' finished as I supposed I was.

I used various sizes of board for the pages and bound them all with two large blue rings. Most of the pages were 8"x 8" but a few were 6"x 6" and the evelopes were 4" wide and cut down to 6" tall.

Most of the Montana Book was completed during the two week trip I made in 2010. I had three goals at the time, one was to incorporate more actual artwork, another was to do most of the work on the road, and the other was to work in more vivid colors than is normal for me. I was only modestly successful at the first goal, fairly successful at the second, but quite successful at the third. Most of the 'finishing' work consisted of adding the envelopes holding my photos from the trip.


Since I was traveling alone, I felt the need to be in contaact with someone - not for safety issues but because it is almost impossible to shut me up. After I returned home, my daughter printed off all my texts and I copied them onto these pages. The color enhanced photos on the back cover were done in Picnik.


I have posted these mosaics on Flickr as well as the original scans in case anyone wishes to take a look at some of the text. I also have a Flickr set with all the photos from the trip http://www.flickr.com/photos/39450859@N07/sets/72157623648251864/
Montana is still home to me, although I have been in Washington since I was in the fifth grade and I am blessed to have a whole bunch of wonderful relatives still there.

Thursday, July 21, 2011

June Pocket Book

I wouldn't want anyone to think I had fallen behind....yet.  My June books were finished well within June, but couldn't be posted as they were gifts for people who do read this blog.  It started with a friend mentioning she was several albums behind in documenting trips to England.  I offered to make her a pocket book, similar to the one I used for my 2007 trip so she could get at least one book behind her by simply putting photos and paper bits in the pockets and adding a minimum of decoration.

As mentioned, I was not completely happy with the pocket book I had made before, so I decided to try and create my own.  I used 12"x12" scrapbook paper - scored, folded, and punched - and rings for binding.  In laying out the folds, which included doubling the edges for strength, I wrote the steps and directions on my sample page and kept it with my other book templates.  While working on the first book, I decided to make similar books for both of her sisters for the gift exchange on our regular "All-England, All-Birthday, Whidbey Island Weekend".


My friend requested her book be in the Union Jack colors of red, white, and blue, so I alternated the colors and folded the pockets as deep as possible while still allowing enough height for the 5X7 photos.  I dug into my stash of England 'stuff' and started her off by loading the pockets with stickers, postage stamps, postcards, tags, and other paper bits. 

I made this with ten pages, which means twenty pockets, and used larger rings for binding.  I suspect when it is full of all the photos, cards and ticket stubs, it will be pretty fat.

The second sister had mentioned that postcards I had given her were kind of scattered around in various places (she is not a collector, just the recipient of cards I just 'know' she needs).  Amazingly I had a group of co-ordinated scrapbook papers that had the word 'postcard' printed in the design of one page so I used it as the cover. I made this book with a shallower pocket since she had no plans to do any decorating, this book was to be totally functional.


For the third sister I had no specific use in mind, but I knew she would put it to good use.  Since she is a crafter, I gave her the deeper pockets in case she chose to decorate the book and I made it in soft feminine colors - which suit her.

The grain of the paper dictated the direction of the design - I would have preferred the stripe be vertical.

The first thing I learned making this book was how important working with the grain was.  With all the creasing and folding, the only fold against the grain had to be the bottom edge, and I creased that rather gently by comparison.  The second thing, which should have been self-evident, was that all measurements had to be PERFECT.  This book allows for no trimming to even things up like blank books with signatures do.  My new pocket book was less bulky than the diagonal fold page, so I was successful in that.

I have at least one more of these to make, also a gift, another travel journal.  It will be taken along on the trip and serve as a repository for collected paper bits and notes during the holiday and then as soon as photos are ready, it will be done.  This one I will get to decorate as well...looking forward to that.

Thursday, June 23, 2011

England 2007 Journal Part II

We are now about halfway through this book and it is starting to get pretty full...and that is the problem with this style, as nice as the pockets are, they really don't take as much as I am likely to want to save.  But then, I guess that is my problem.
Pretty much more of the same.  There is a story behind the photo of the performance artist in Winchester on my regular blog here http://animumadvertere.blogspot.com/2011/06/more-winchester.html
I took vintage postcards with me, most made into tags, and wrote on the backs.  I also purchased new postcards and wrote on them.  After I got home, I did prune back some of the paper, largely by only saving relevant parts or front pages.
I must make a confession here, I never did find anything suitable to put in the nifty pocket I attached to the inside back cover.  I am confidant something will come to me - it has only been four years after all.
And of course, the back cover had to have my beloved Tower Bridge, a wonderful rubber stamp by Claudine Hellmuth.
I think I have covered most of the various things I put in the pockets, but here are a few examples:

From the top: one of the vintage postcards made into a tag and embellished with a postage stamp; a rubbing from the church shown on the reverse of the postcard I glued it to; the bill from a hotel with a humorous exchange as we drove into the town; a cartoon I had saved before the trip.

I really didn't take much other than the actual book on the trip.  I took some thin paper and soft pencil for tracing, a glue stick, a couple of fine line pens and as mentioned, blank tags and vintage postcards.  The most important thing is to keep the book with you and when something wonderful or clever or funny happens - write it down immediately, on a card or the bill or the back of a ticket stub.  You can never quite remember them perfectly later, and these are the things that make travel journals special.
Some sample jottings:
   Poetic...The Quiet, the absolute peace and quiet atop Dartmoor, a sheep bleating across the valley, a crow passing by, and occasionally a gust of wind ruffles the gorse.
   Amusing...After I left the shop I sat on the rockery in front and watched the world go by. Then I visited the PO and bought some stamps, then sat on the rockery again for a while.  A sweet old lady who had passed me coming and going stopped and asked me "Are you hatching something dear?  And isn't your bottom cold?"
   A B&B...Period Living & Traditional Homes Finalist - Best Tea Shop 2004-2005.  NO BIG SURPRISE THERE! So far, best pasty, best cream tea, best furnishings, best mattress, best full English breakfast and best host - that would be John - a real charmer.
   Food...Tomato & fresh orange soup with a great hunk of granary bread & plenty of pure Dorset butter - and not one drop spilled on my white blouse.

My June book, which will be posted soon, is a version of a pocket book which I worked up myself considering the things I didn't like about this one.  Like all such enterprises, I solved the problems with this book and wound up with some wholly new ones I hadn't anticipated.

Monday, June 20, 2011

England 2007 Journal, Part I

I learned to make this book at a workshop.  The pages are folded 12x12" scrapbook papers and at that time I only had a reasonable amount of 12"x12" paper to work with (as opposed to the very unreasonable amount I now have) so the color scheme was determined pretty much by what I had the most of.  Although I am very happy with the book in general, it turned out to be a bit thick, rather clunky.  The book was made and much of what eventually went in the pockets was prepared before the trip.  After we got home, I decorated the pages, copied over some of the jottings, and added some bits I had at home.


The pages had punched holes and were bound by some elastic ribbon I was lucky enough to find in the perfect colors.  I had been saving a couple of pewter Tudor Rose buttons for just such a project.  The bookplate is also metal.

I feel that I need to explain why the Journal is titled York 5x3, especially since we didn't go anywhere near York.  Our first trip to England, and the Journal from that trip was entitled 'The Great York Expedition - and we did go to York.  When we began planning the second trip, thinking we would go back to Yorkshire, I called it 'York 2'.  Understand that I probably had a dozen Excel spreadsheets preparatory to making the trip and so I needed an umbrella title.  Although we eventually didn't go to York on the second trip, the name stuck and we had started a tradition of sorts.  So the third trip was lazily called 'York 3'.  Then along came the fourth trip in 2000 - what a lark to be able to call it 'Y2K'.  The fifth trip included my son-in-law so there were three of us and it became York '5X3'.  Amazingly enough, the sixth and most recent trip actually included York and was largely centered around a group of old friends visiting all seven of the Betty's Tea Rooms in Yorkshire - so it was York4T...get it?  I am already working on an itinerary for the hoped for next trip - goodness knows when or how - and it does not include York, but I simply have nothing clever yet in the way of a title.

The Vintage postcard I decorated the inside cover with is by the photographer Fred Judge whose cards I collect.  Like everything else I do, the pages and pockets of this book were highly decorated with postage stamps.  I also used rubber stamping and some stickers.  Beer mats made great additions to the pockets.

I took along blank pieces of paper already stamped and tagged, and wrote on them as we traveled.  I tried to capture the little things that made us laugh or caught us by surprise, I wasn't worried about listing exactly where we went or what we did when.  These pockets have another beer mat (I'm awfully fond of cider) and a small brown paper envelope with a pressed oak leaf from the Cotswolds.
And here is a journaling hint for you.  Since customs looks down on bringing any flora or fauna back into the country, I always take a thick paperback for reading.  On the trip I tuck a few leaves, feathers and flowers into the pages and keep it closed tight with a heavy rubber band.  By the time I get home and unpacked, everything is nicely pressed.  No one has caught me yet.....

More notes, one of my best photos, and a notecard.  I used a teabag wrap as a pocket and managed to pull a price tag from one of my small purchases.  I had a small clear envelope that I filled with several small coins.

A playing card from a childrens game, the lid from clotted cream (don't knock it if you haven't tried it), a theatre ticket, and another plastic envelope with another oak leave and a car park ticket.

Tags, notes, pressings, postage stamps, rubber stamps, stickers, a vintage photo, and more postcards.
This is the first half of the book and I will finish in the next post.

Thursday, June 16, 2011

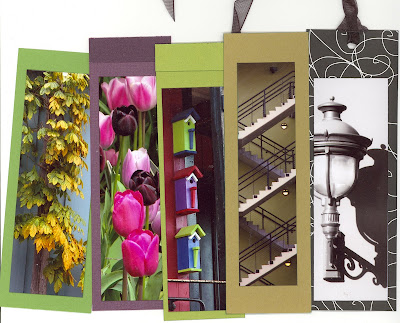
Bookmarks - Series 1

Every good book needs a good bookmark.  In spite of the fact that I have a whole jar full of collected bookmarks of all sorts, I most often use an unloved antique postcard.  One of the joys of buying used books is that one sometimes finds a previous owner's bookmark remains - I've found train tickets, theatre tickets and sales slips from foreign countries - which tells me that I am not the only one loath to part with those little paper mementos.

While I am playing around with my photos - editing and enhancing, rearranging, uploading to any site that will take them - I find some that simply do not crop well into anything other than a bookmark shape.  And so I have been 'collecting' them and I have a flickr set devoted just to them: http://www.flickr.com/photos/39450859@N07/sets/72157623342914837/detail/

So I finally converted a bunch of them into photos and spent a couple of afternoons using up paper bits, punching holes, and carefully coloring the cut edges of both photos and papers.

I made forty-four of them and have already given some of them away.  Pretty sure I'll be making another batch before the year is out.

Sunday, May 22, 2011

May Ribbon Book

I have spent hours poring over my various books on books, sorting through the hundreds of variations on the scores of bindings, stitchings, and creative permutations.  Eventually a few rise to the top as ones you are a little afraid of, as well as the ones that you just have to try.  I am still avoiding the scary ones while trying to advance my education and skills.  So this month I made two 'ribbon books'. The instructions came from The Handmade Book by Angela James.

The cover and finishing is quite simple, but there is new stitching to learn for binding the signatures together.  I started with six signatures and sewed them together using a running stitch up and back down each signature.  As you add the third signature you begin going back and using a 'kettle stitch' to bind the signatures together.  Typically a proper book has stitching over two or three pieces of tape which are bound into the cover.  In the ribbon book, you use ribbon instead of tape, make slits in the folds of your cover paper and pull the ribbon ends out through the slits, tying them on the outside.  This keeps the book block safely attached to the cover.


For the first book I used lavender text weight paper with some darker sheets and some floral print sheets dropped in here and there.  The ribbon was a heavyweight gauze and I used a stitch pattern for three ribbon ties.  The only problem I had was that the book block didn't feel as snugly together as I would have liked.

Nevertheless, I was so pleased with this first one, I decided to make another one.  This time I used a natural shade paper - text weight but on the heavy side and I used a woven cotton ribbon with only two ties.  I have a friend who recently bought a very nifty little travel trailer and she asked me to keep a lookout for a book that would suit her for a travel journal.  I wasn't far into this book when I realized it was perfect for her.  So I finished this one with travel and nature quotes handwritten on a dozen pages, rubber stamped images in shadow shades on about every third page, and I pulled some of my best postage stamps of plants, animals and trees for another dozen pages.  Finally, I finished the cover with a feather from my precious stash of bits smuggled back from England and used a stamp pad to darken all the edges - both cover and text block.

The feather came from the Tithe Barn in Lacock in the Cotswolds.
I can say with confidence that my friend was pleased with the book and I have an idea for another one with a slightly different theme for someone that was quite envious, so this probably won't be my last ribbon book.